 |
| Loop diagram * |
A perfectly designed temperature loop would precisely balance the power required to heat the media to it's desired temperature while compensating for system losses. In the real world however, there are many external variables that upset the balance between energy input and desired temperature. To offset these external variables and ensure adequate power is available to do the work, energy calculations with liberal safety factors are coupled with temperature controllers that throttle or proportion the amount of energy added to the process.
Most temperature control loops have (5) four major components:
1) The media to be heated (e.g. metal platen, a tank of liquid, a stream of gas)
2) A energy source (e.g. electric heater, steam, hot oil, flame)
3) A temperature sensor (thermocouple, RTD)
4) A controller (e.g. electronic thermostat, PID controller)
5) Control element (e.g. control valve, SCR, SSR)
Temperature controllers provide sophisticated functions that "learn" or understand the relationship between available power and sensor temperature. They then adjust the amount of energy (heat) added, based on the current reading of the sensor and the desired temperature setpoint. Unfortunately, temperature controllers are often relied upon to overcome the oversights and inadequacies of poor control loop design.
 |
| Lag time * |
In poor control situations the controller usually takes the blame, when in actuality, the problem lies in the system design. The controller's actions are a function of the difference between setpoint and sensor reading, the availability of energy to eliminate that error, and the sensor lag time. The further the
sensor or energy source is located from the process media, the wider the swings in energy input will be, and therefore produce a more difficult loop to balance. Considering this, it is important to optimize the sensor (
thermocouple or RTD) placement. Any distance or barrier between sensor and process media introduces lag which is an impediment to close control.
In the most ideal situation,
temperature sensors, the energy source and process media would all be at the same physical location. Since it's virtually impossible to accomplish this, compromises have to be made to allow for the mechanical, physical, and electrical realities of the application. Here are some practical recommendations for sensor selection and placement to improve temperature loop performance:
- Thermocouples, because of their low mass generally have a response advantage over RTDs.
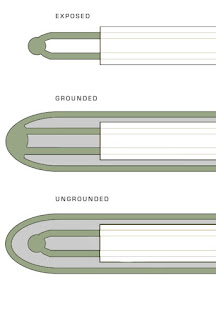
- Exposed junction thermocouples are the fastest responding (least lag) sensor choice, but they are also the most prone to physical and chemical damage.
- Narrow, sheathed, grounded junction magnesium oxide insulated thermocouples are nearly as fast as exposed junctions, and provide protection from the process media.
- Applications that require protection sheaths and thermowells for RTDs and thermocouples increase sensor lag time.
- An immersion length of at least 10 times the diameter of the thermowell or sensor sheath should be used to minimize heat loss along the sensor sheath or thermowell wall from tip to process connection.
- Where possible, insert the temperature sensor in a pipe elbow into the oncoming flow.
- Tapered, swaged, or stepped thermowells are faster responding
- Always make sure the fit between sensor outer diameter and thermowell inner diameter is tight, and that the tip of the sensor is in direct contact with the thermowell.
* Images courtesy of Tony Kuphaldt and his book "Lessons In Industrial Instrumentation"


 Thermocouples are simple devices made up of several key components: thermocouple wire, electrical